
Of wiggle photography
Demo
Wiggle Stereoscopy
Wiggle stereoscopy is probably the cheapest trick to give your brain a 3D feeling. While most technics try to take advantage of binocular vision by giving your left eye and your right eye different pictures, wiggle stereoscopy is just about looping on a couple of pictures with a slight shift of point of view. Your brain will interpret the parallax and give you a sense of 3D. What’s parallax ? Imagine you’re in the mountain driving in a car. You’re looking out the window. Objects far away are moving slowly, objects closer seem to move very fast. That’s parallax!
In this post, I’ll show how to implement this effect with CoffeeScript, Canvas (no need for WebGL, Flash or anything), and simple image editor.
Depth Map
But first, we need to be able to get a description of the 3D shape of our picture. The three animation above have been created very simply from 2D-images.. The 3D information has been added using a “depth map”. A depth consists of an image of the same size of your original picture, but encoding the z-coordinates of each pixel. Basically it’s encoding how close to us the pixel is supposed to be.
To create one, just open your favorite image editor, and create a new picture. Fill it with black. Black will be our background background. It is assumed to be far away. Now just pain very roughly in grays shades the region you want to “pop out”. The brighter it is, the closer it will feel. Don’t try to be too accurate, 3 shades are probably sufficient.
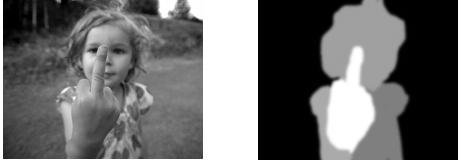
At this point the resulting depth map probably consists of a couple of wide areas associated to different levels. But let’s get real, most of the world is not that square. One very neat trick here is to smooth your depth map with a gaussian blur. It will very likely make everything look more natural. And to tell the truth, our rendering will look very shitty if your depth map is not smooth.
The poor man’s 3D
We could write a ray-tracer, but I’m afraid it might take a little too long at execution (And I’m lazy, so proove me wrong internet!). Instead we’re going to do something very cheap. High Schooler cheap actually. We’ll do the opposite of ray tracing and compute the project of the point of our initial image into our camera’s sensor.
So let’s take a look at the geometry of our little problem here.
Given (i,j) and its depth d(i,j), we want to find the coordinates (x,y) of its projection in our camera. In order to get a nice effect we decided that all the camera were pointing at a very specific point of the image, which would always be projected at the center of our rendered image (x0, y0).
For simplification I did a little schema in 2D but it is actually to adapt it to 3D.
We just apply Thales theorem to this problem in order to get the distance x of the projected
point to the center of our rendered image x0.
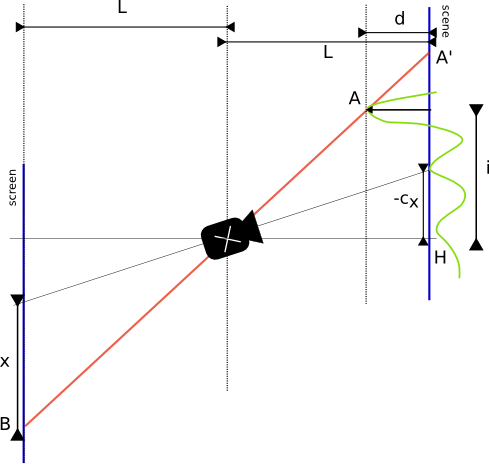
Ok so we assume we are looking to the center O of our scene, and take this point as the depth 0 reference. It means that the image of O is the center Q of our scene. H is the projection of the camera C on the scene plan.
Given a pixel at a position i, it’s image A is at a depth d(i). We want to find the coordinates of its image on the projection screen (Or rather, the sensor of our camera). Basically we want to find the distance QB=y.
Thalès gives us the answer to this problem :
So if we have a value for a pixel at coordinates (i,j) it should be projected into the pixel (x,y) such that :
where cx and cy is the coordinates of the projection of the camera on the scene.
Actually here our projection screen has been considered parallele to the scene for this simple version, we might want to keep it perpendicular to the axis of the camera. With the value we used for our camera, the correcting factor was however neglectable (0.99 instead of 1).
render_scene = (img, depth, camera)->
  # the poor man's 3d
  W = img.width
  H = img.height
  dest = create_image_data W,H
  imgp = img.data
  depthp = depth.data
  destp = dest.data
  x0 = Math.ceil (W/2)
  y0 = Math.ceil (H/2)
  d0 = depthp[ (x0+W*y0)*4 ]
  c = 0
  N = W*H*4
  for j in [0...H]
    for i in [0...W]
      d = (depthp[c]-d0)
      r = camera.L  / (camera.L - d)
      # compute x,y : the projection of pixel (i,j,d)
      # according to our camera.
      x = Math.floor(x0 - camera.x + (camera.x + i - x0)) * r
      y = Math.floor(y0 - camera.y + (camera.y + j - y0)) * r
      destc = (x+W*y)*4
      if (0 <= destc < N)
        for v in [0..3]
          destp[destc+v] = imgp[c+v]
      c+=4
  fill_with_average destp, W, H
  for c in [0...W*H*4] by 4
    destp[c+3] = 255
  return dest
At the end of the function we are calling a function called fill_with_average. It is here to fill the gap. Since we are just
moving pixels, some pixel are likely to get moved to the same destination pixels… Which means that we get some gaps in
the destination image. Yes that’s a cheap algorithm, but we
just run a small method to detect these gap pixels and fill them with
an average of their neighbors.
Wiggle stereography typically use two pictures. Actually I found that the effect was much more efficient if we were rendering a lot of pictures, just turning around given point of view.
You can check out the final script on github.